
Imagine having a single platform that gives you complete control over your launches on PumpFun — sounds like a dream, right? That’s exactly what Pumpski Suite brings to the table. Pumpski Suite combines not one but three incredibly useful bots into one convenient package: the Bundler, Bump Bot, and Volume Bot.
Each of these powerful bots has been designed to streamline your process, saving you time and effort while maximising your results. Whether you’re bundling assets, boosting visibility, or managing trade volume, Pumpski Suite does the heavy lifting for you.
Here is the complete guide to help you understand how to get the most out of Pumpski Suite. Whether you’re new to PumpFun or a seasoned user, you’ll discover why Pumpski is such a game-changer. Ready to dive in and take control of your launches? Keep reading to unlock the full potential of this incredible tool.
Step 1: Naming Your Token
The first step in setting up your token on Pumpski Suite is choosing the right Token Name and Symbol — this is your project’s identity! Here’s how to do it:
- Enter Your Token Name: This is the full name of your token. For example, if you’re creating a token called Pepecoin, type “Pepecoin” in the Token Name field.
- Enter Your Token Symbol: The symbol is the shorthand or ticker for your token. For instance, if your token is Pepecoin, your symbol might be “PEPE”.

💡 Pro Tip: You can find both the Token Name and Symbol in the Token Creation Card located at the top-left corner of your Pumpski Dashboard. Make sure these details are unique and aligned with your branding to make a lasting impression.
Once you’re satisfied with your chosen name and symbol, click the Next button to proceed to Step 2. This simple but crucial step sets the foundation for your token’s identity — so take your time to get it just right!
👉 Explore More: This is why Pump.fun Can Make You Millions or Break You
Step 2: Uploading Your Token Image
Now it’s time to give your token a face! A great image can make your token stand out and grab attention. Here’s how to do it in just a few clicks:
- Click “Upload Image”: This will open your File Explorer (or Finder if you’re on Mac).
- Choose Your Token Image: Select the image you want to use as your token’s visual identity. It could be a logo, an icon, or any image that best represents your token.
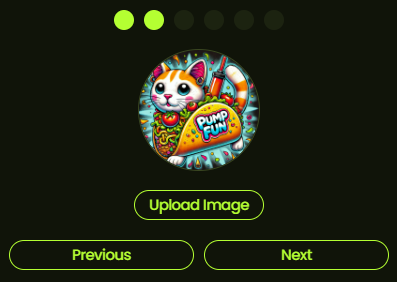
💡 Pro Tip: Use a high-quality image that’s clear and visually appealing. Your token image is the first thing people will notice, so make it count!
Once the image is uploaded, take a moment to check how it looks. If you’re happy with the result, click Next to proceed to Step 3. Your token is already starting to take shape, and it’s exciting to see it come to life!
👉 Related Guide: How to Design a Killer Token Logo
Step 3: Adding a Description (Optional but Powerful)
Here’s your chance to tell the world what your token is all about! While this step is optional, it’s a fantastic way to give your token some personality and purpose.
- Set Your Description: Write a brief but compelling overview of your token. Highlight its purpose, value proposition, or anything unique about it. For example:
“Pepecoin is a community-driven token designed to bring fun and value to meme enthusiasts while creating real-world utility in decentralised finance.” - Review and Finalise: Once you’ve added your description, take a quick look to ensure it captures your token’s essence.

💡 Pro Tip: Keep it short and snappy! A clear, engaging description can make your token more appealing and help potential users or investors understand its purpose.
When you’re happy with it, click Next to move on to Step 4. Remember, a strong description can make your token more memorable — so don’t skip this opportunity to shine!
👉 Learn More: Boost the Visibility of Your Token Project
Step 4: Adding Social Links (Optional but Highly Recommended)
Want to connect your audience to your token’s community? This step is all about giving your token a social presence by linking your platforms. Here’s how to do it:
Enter Your Social Links: Provide the full URLs to your token’s official social media accounts or community pages. For example:
- Website: https://www.sampleadress.com
- Twitter: https://twitter.com/sampleaddress
- Telegram: https://t.me/sampleaddress

Double-Check Your Links: Ensure all the links are accurate and functional. A broken link can deter potential users or investors, so a quick review is worth it!
💡 Pro Tip: Even if you’re just starting, having a few active social channels can boost your token’s credibility and foster community engagement.
Once your social links are in place, click Next to proceed to Step 5. By adding these details, you’re giving your audience a direct line to learn more about your project and join the conversation.
👉 Explore Next: 14 Tips for Building & Growing a Crypto Community
Step 5: Setting the Buy Amount & Jito Tip
This is where you fine-tune the financial and transactional details of your token launch. It’s all about ensuring your first transaction is smooth and prioritised. Here’s what to do:
- Set the Buy Amount: This is the amount of SOL that the deployer wallet will purchase on the first transaction. Choose an amount that aligns with your launch strategy.
- Set the Priority Fee (Jito Tip): This fee ensures your bundles are prioritised on-chain. During periods of high market activity and volume, consider increasing the priority fee to stay competitive.
- Double-Check Your Wallet: Make sure your wallet has enough funds to cover all associated fees, including:
- Buy Amount
- Priority Fee (Jito Tip)
- An additional 0.02 SOL
- Plus 1% PumpFun Buy Fee
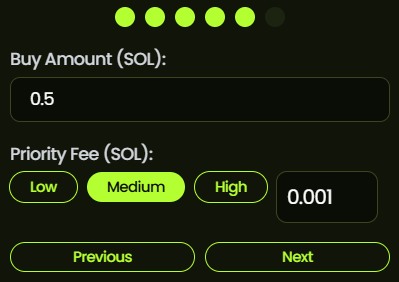
💡 Pro Tip: Setting a slightly higher priority fee during active markets can help ensure your transactions are processed quickly, keeping you ahead of the game.
Once you’re confident in your settings, click Next to proceed to Step 6. This step ensures your token launch starts strong, with everything running smoothly from the first transaction.
👉 Related Article: How to Speed Up Transactions in Blockchain
Step 6: Setting a Vanity Keypair for Your Mint Address
Here’s your chance to add a personal touch to your token by creating a custom Mint Address. A vanity keypair gives your token a unique identity and boosts its professionalism. Let’s break it down:
Generate a Vanity Address
Click the “Get Vanity” button to start generating a mint address that includes your chosen word or characters, such as one ending in “pump.”
Keep in mind, generating a vanity address requires a powerful computer to process efficiently.
Fallback Option
If generating a vanity address isn’t feasible or time is tight, you’ll be assigned a standard random address that doesn’t end in “pump.”
Want Vanity Done Faster?
You can click “Purchase Vanity Pack” to buy pre-generated vanity addresses. Purchasing a pack of 50 wallets gets you the best volume discount, so it’s a great option if you plan multiple launches.
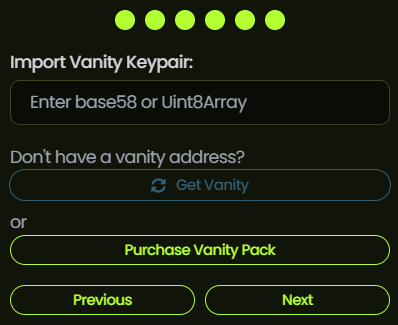

Optimise Your CPU Usage
Set the Amount of Workers to the total number of your computer’s CPU cores minus 2 for maximum efficiency.

Automatic Integration
Once you import or generate a valid keypair, it will be seamlessly set in the chart component.
💡 Pro Tip: A vanity address adds credibility to your token launch and creates a memorable impression. For serious launches, this step is crucial.
Real-time charts are provided via the GMGN API, so you can track your progress instantly. Once you’re satisfied with your setup, click Next to move on to your Token Overview.
👉 Next Step: Custom Mint Account Keypair Use Cases
Final Step: Launch Your Token! 🚀
You’ve made it to the most exciting part — launching your token! This is where all your preparation comes to life. Here’s what to do:
Choose Your Mint Address
If you haven’t already, you can generate a vanity keypair by clicking the “Get Vanity” button. This lets you customise your Mint Address, perhaps with an ending like “pump” for added flair.
Remember, generating a vanity address requires a powerful computer, so ensure your setup is ready.
Fallback Option
If generating a vanity address isn’t possible, don’t worry — you’ll automatically be assigned a standard random address that works just as well.
Speed Things Up
For faster results, consider purchasing a Vanity Pack. Buying in bulk, such as a 50-wallet pack, provides significant volume discounts, making it a smart investment for larger-scale launches.
Optimise Worker Settings
Maximise your CPU efficiency by setting the Amount of Workers to your total CPU cores minus 2.
Automatic Integration
Once your keypair is generated or imported, it’s immediately integrated into the chart component, allowing you to monitor in real-time via the GMGN API.
💡 Pro Tip: A vanity address is more than just cosmetic — it boosts trust and gives your token a professional edge. If you’re doing a serious launch, this step is worth the effort.
When everything looks good, click Next to review your Token Overview. This is your moment — your token is now ready to make waves!
👉 You Might Like: 5 Tips for a Successful Token Launch
How to Swap Tokens with Pumpskie Suite: A Quick and Easy Guide
Swapping tokens has never been simpler! With the “Swap” widget, you can exchange tokens quickly, efficiently, and without worrying about fees — we take 0% fees on your swaps. Here’s how it works:

- From Token: Select the token you want to exchange. This is the token you’re swapping out.
- To Token: Choose the token you wish to receive in return for your swap.
- Price Impact: Keep an eye on this metric! It shows the anticipated change in the token’s price as a result of your transaction. For large swaps, higher price impacts are possible, so plan accordingly.
- Minimum Received: This figure represents the least amount of the new token you will receive after the transaction. It factors in slippage to give you a safety net.
- Route: The platform or protocol that facilitates the exchange. It ensures your swap is processed through the most efficient and reliable path.
💡 Pro Tip: With zero fees, the “Swap” widget ensures you get the most out of your transactions. It’s a great choice for seamless token exchanges without cutting into your earnings.
Ready to start swapping? Dive into the “Swap” widget and experience fast, hassle-free token exchanges today!
Customising Your Trading Settings for a Smarter Swap Experience

Your trading experience can be tailored to suit your style and optimise profitability, and the settings panel in the Swap Widget is your go-to tool for this. Access it by clicking the cog (⚙️) icon in the top-right corner of the widget on your Dashboard. Let’s break it down:
1. Adjusting Slippage
Slippage defines how much the price can move before your transaction is reverted. You can select from preset values or input a custom percentage:
- 1% Slippage: Ideal for low-volume trades — this limits price movement to 1% before the transaction is cancelled.
- 1–3% Slippage: Perfect for PumpFun tokens during moderate trading activity.
- Up to 5% Slippage: Useful during high-volume trading but comes with higher risk.
- Avoid High Slippage: A setting like 50% can cause a significant loss, potentially leaving you with only half of your intended buy value. Use higher percentages with extreme caution!
💡 Pro Tip: Always balance your slippage settings with the trading volume to minimise unnecessary losses while ensuring smooth transactions.
2. Setting Transaction Speed (Priority Fee)
You can modify the transaction speed by selecting one of the following options:
- Normal: 0.000001 SOL — Suitable for low urgency.
- Fast: 0.00001 SOL — Great for most trading scenarios.
- Instant: 0.0001 SOL — Prioritises your transaction, especially during peak trading times.
💡 Pro Tip: If you’re experiencing dropped transactions, try increasing the transaction speed or reaching out for support.
Need Help?
If you face issues like dropped transactions, don’t hesitate to contact @DangerAcorn on Telegram or Discord for assistance.
Take a moment to fine-tune these settings to align with your trading goals, and you’ll be all set for smoother, more profitable trades.
Wallet Selection
This is where you can select the wallet you would like to trade with. Currently there is a Deployer and Funder wallet, but I will be expanding to use all wallets soon.
How to Use the Bump Bot: A Step-by-Step Guide
Starting and running the Bump Bot is incredibly easy. Whether you’re looking to boost visibility or manage token activity, this guide will have you up and running in no time.

1. Generate Your Bump Wallet
The first step is to create your Bump Wallet. This wallet will be used for all your bumping activities.
2. Export Your Bump Wallet
For security, always export your wallet details and save them in a safe location. This ensures you can recover your wallet if needed.
3. Send Tokens to Your Bump Wallet
Now, it’s time to fund your wallet:
- Click the three dots on your wallet item.
- Select “Send Tokens” from the dropdown menu.
- Enter the amount of SOL to transfer (recommended: 0.1 SOL for regular bumps).
💡 Pro Tip: Keep your wallet funded with enough SOL to cover bumps and transaction fees for smooth operation.
4. Configure Your Bump Settings
Customise your bumping preferences to fit your strategy:
- Bump Amount: Enter the amount of SOL for each bump (e.g., 0.01 SOL).
- Delay: Set the delay between bumps in milliseconds (e.g., 5000ms for a 5-second interval).
5. Finalise and Start Bumping
- Make sure you’ve set a mint address for the tokens.
- Click the “Start” button in the top-right corner to begin the bumping process.
6. Monitor Your Progress
Keep an eye on your status in the top-left corner of the dashboard to track the bot’s activity in real-time.
💡 Pro Tip: Regular monitoring ensures your settings are working as intended and that your wallet is adequately funded.
With these steps, you’re ready to make the most of the Bump Bot. It’s a simple yet powerful tool to enhance your token’s visibility and engagement.
👉 You Might Like: Always Win with This Pumpfun Filter [100% Tested Strategy]
General FAQs: Everything You Need to Know About Pumpski
Here are answers to some of the most frequently asked questions about our products, services, and purchasing process. Let’s clear up any doubts you may have!
1. Do You Store Private Keys?
Absolutely not. All of your data, including private keys, is stored locally on your device via local storage. We don’t use databases or make public API calls involving your keys, so your data stays private and secure.
2. Does Pumpski Have an Official Token?
No, Pumpski does not — and will never — have an official token. Beware of any claims otherwise, as they are not legitimate.
3. Why Don’t You Keep the Tool to Yourself?
Pumpski has been a personal project for over seven months. I use it regularly for trading and wanted to share its capabilities with others who could benefit from it.
4. Is There a Trial Option for Pumpski?
Yes, there is! Check out our pricing plans for details on trial options and see how Pumpski can work for you before committing fully.
5. Does Pumpski Take Any Fees?
Not a single penny! Pumpski charges no fees. However, Pump.Fun does impose a launch fee of 0.02 SOL and takes 1% of each trade (buy or sell).
6. What is the Future of Pumpski?
The future is bright and full of innovation. Pumpski aims to push the boundaries of what’s possible on Solana by developing cutting-edge technologies rather than recycling existing software.
7. Can I Sell or Transfer My Products to a Friend?
You cannot sell your products to a friend, but you can transfer your license to a new user or account. Just reach out to us, and we’ll handle the transfer for you.
💡 Pro Tip: If you have more questions, don’t hesitate to contact us. Pumpski is built with transparency, security, and innovation at its core, so we’re here to help you every step of the way!
👉 You Might Like: Pumpfun Volume Bot: How to Pump any Memecoin (Artificially)
Ready to Take Your Trades to the Next Level?
PumpFun isn’t just a tool — it’s your ultimate companion for navigating the Solana ecosystem with confidence and ease. Whether you’re a seasoned trader or just starting out, Pumpski empowers you with innovative features, zero fees, and the flexibility to customise your trading experience. Why wait? Start exploring everything Pumpski has to offer today and see the difference it makes in your trading journey.
💡 Take the First Step: Try PumpFun Bundler and unlock a world of seamless, powerful, and efficient trading! 🚀